Menu
There are many ways to mount a phone or webcam over a piano keyboard, and a host of household items that have been repurposed in the name of indoor overhead photography.
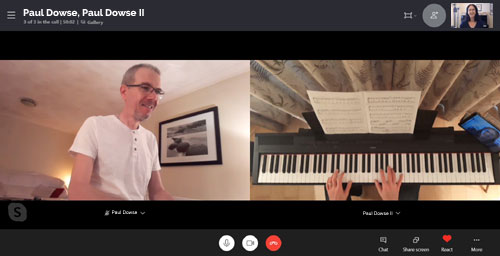
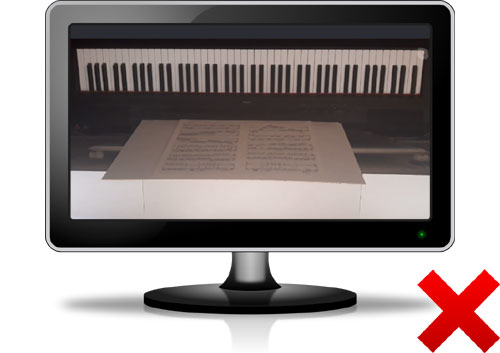
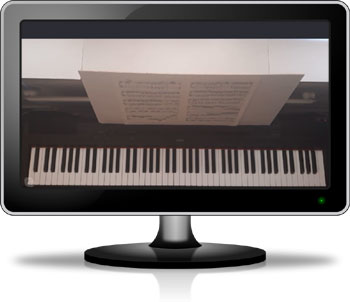
The goal is to get the phone or webcam directly over the centre of the keyboard, or as close to that as is possible, high enough so that all 88 keys can be seen. This will give the classic top-down shot of the entire keyboard that a teacher (or anyone else studying your playing) wants to see.
 Tip
TipHere we'll look at light stands (used to achieve the above shot), which for my money is the best approach; cost effective, quick and simple.
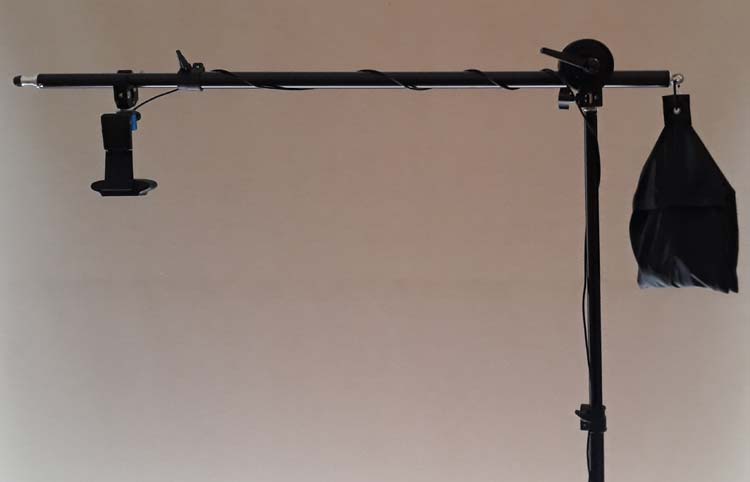
The parts required are a light stand and boom arm, which can be bought separately or as one unit, a ball head clamp mount, and - if you are using a smart phone - a phone holder. Here we'll take a closer look at everything you need to achieve the perfect shot.
 In a Nutshell
Light Stands
When mounting your phone or webcam, a light stand with a boom arm provides the perfect solution: Inexpensive to buy, quick to set up, and very flexible with positioning.
A light stand is a stand used by photographers to support flash guns and other lighting equipment such as softboxes and umbrellas.
When combined with a boom arm they are perfect for mounting camera phones and webcams over a keyboard. In most situations you will be able to get the camera perfectly central and perfectly square with the keyboard.
Most boom arms will give you well over 100cm (more than 3') of reach, allowing for flexible positioning (usually at one side of the keyboard or behind it). When using a light stand to the side of the keyboard 100cm will generally be enough reach, but something longer will give you additional flexibility.
Where a standard camera tripod will reach a height of around 170cm (5' 7”), light stands can easily be found that can stand 200cm tall (with other models reaching well over 300cm, far higher than the average room). You can even tilt the boom arm up to gain more height.
Depending on the camera's field of view, mounting it higher than 170cm is frequently necessary to get all the keys in. A light stand offers the perfect solution. As a general rule, phones need be mounted higher than webcams, which tend to provide a wide angle view.
If space is a concern, note that the legs of the stand need be at least 40cm (16”) apart to form a stable structure. Wider still is recommended if space permits. If you are using a keyboard on a stand you may find one of the legs will fit under the keyboard stand (when the light stand is placed to one end of the keyboard), meaning you may need less than 30cm of space to one side of the keyboard.
If you cannot place the stand directly to one side, you can position it in front of the keyboard (still as close to one end as you can).
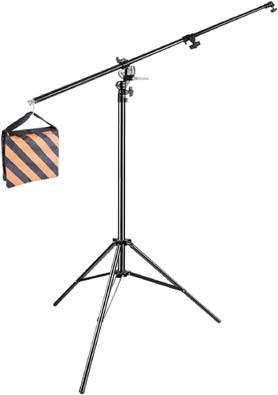
You can buy light stands and boom arms separately, or you can buy them as one piece, as with the Neewer Tripod Boom Light Stand shown above (view it now at Amazon ).
).
This will give you a stand height of up to 230cm (which is more than sufficient for most applications), and a reach of 190cm. The stand and boom are telescopic, so you don't need to be able to accommodate all of its height and reach.
You can read more on this stand at Neewer's official site.
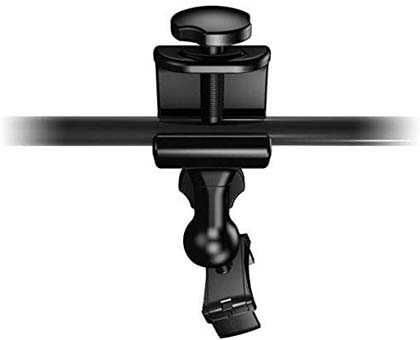
TipOnce you have the light stand you'll need add a clamp for your phone or camera. The type of clamp will depend on your equipment, so we'll look at a few examples.
The iKlip Xpand Mini Support for Phones
From IK Multimedia, the popular iKlip Xpand Mini is a smaller version of their tablet oriented iKlip Xpand. The retail price is a bit steep at €48.79 (around £44), although shopping around you should be able to find it in the £30 - 35 range (view it now at Amazon).
It is marketed for those looking to attach a phone clamp to a microphone stand, but it works just as well with light stands.
It can be securely attached to the boom arm, holding the phone face down over the keyboard. The phone clamp uses a ball head, meaning that fine adjustments can easily be made.
If the boom is coming in diagonally over the keyboard you can easily rotate the clamp to square the phone, getting the image of the keyboard level. If the boom arm is not at 90 degrees you can tilt the phone parallel to the keyboard. You can also adjust the phone backward and forward to moving the keyboard up and down in the image.
Loosening the thumbscrew allows for quick and easy image flipping (for more on that, see Setting Your Overhead Phone's Orientation).
For phones this clamp is almost impossible to fault, although you do pay for the luxury. It is not the cheapest clamp going, and less expensive solutions can be found.
Visit IK Multimedia's site for more details on the Xpand Mini
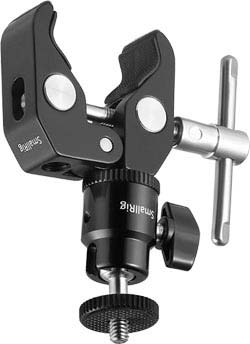
SmallRig Super Clamp
Attaching a clamp mount to the light stand's boom arm will provide a mount for your phone holder or suitable webcam.
Some webcams have a mounting thread which allows it to attach directly to a mount. However, many webcams lack the mounting thread and require a spot of creativity (more on that below).
There are many clamp mounts on the market so you won't have any problem finding one. The SmallRig Super Clamp is a good example
of what to look for. It will clamp to poles a thin as 15mm and as thick as 54mm, making it perfect for use on a boom arm. As with most such clamps it
is designed for use with cameras, so has no problem with lightweight gear such as webcams and phones (view it now at Amazon).
One thing to insist on with a clamp is that the mount (the 1/4” thread) is on a ball head. This allows you to rotate your phone or webcam, and tilt it in any direction, making those minor adjustments far quicker and easier.
As with many such clamps, it is actually two items, the ball head and the clamp. They can be bought separately from various manufacturers, but it is often cheaper and easier to buy them together.
Increase stability and minimise the chance of the clamp moving over time by clamping it to the boom are such that it points down. If you are using a webcam and need the mounted thread at 90 degrees to the clamp, tilt the ball head into the slotted side to achieve this.
A quick word to the wise. All camera mounts should have a locking thumbwheel, as shown on the SmallRig's 1/4” mount. To use, first ensure it is screwed on as far as it will go. After screwing on the phone holder or webcam (not tightly), unscrew the thumbwheel so that it moves up the thread and presses firmly against the underside of the phone holder or webcam, locking it in place.
On most mounts this is particularly useful as it allows you to have your camera secure and facing in the desired direction. Having it pointing in the right direction would be unlikely if you just screwed it on as far as it would go. However, as a ball head mount rotates, the initial direction is not an issue, but the locking thumbwheel is still useful for ensuring your phone holder or webcam is secure and doesn't move.
One more word to the wise. While it is always easier to attach your phone holder or webcam to the clamp before attaching the clamp to the boom, it is especially true when attaching a webcam. That way you can rotate the clamp, not the webcam, and avoid causing damage to its USB lead.
For more details, see the SmallRig Super Clamp on SmallRig's site.
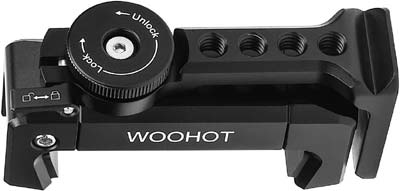
Woohot JL-1618 Phone Tripod Adapter
There are many phone tripod mounts on the market, ranging from pennies into double digits.
Most will do the job, but the one I've chosen to highlight is the Woohot JL-1618.
It has a thumbwheel for tightening its grip on the phone, which for my money is preferable to the simple sprung versions. It has threaded holes on the rear of the clamp (as well as the bottom of the clamp and the bottom of the holder), which means
you can have your clamp mount pointing straight down from the boom arm (rather than out at 90 degrees), making it more stable. Metal
construction adds a touch of quality and durability (view it now at Amazon).
Far less expensive models are available, and most will do the job. Always check it will fit your phone, and that it has a threaded hole on the back (the longest side). This allows you to mount it to a downward facing clamp, creating a far more stable structure.
Mounting a Webcam
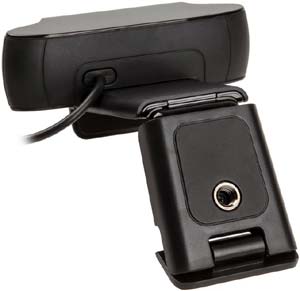
Some webcams have a 1/4” thread on them (the same thread you'll find on phone holders and the underside of cameras). If your webcam has one it can be attached to a pole clamp mount (or a tripod). Unlike mounting a phone, a separate holder is not required.
Attach the webcam to the clamp before attaching the clamp to the boom.
If you own a webcam without a thread (and many are without, sadly not designed to for tripod mounting) then you will need get creative.
One popular solution is to utilise a locking thumbwheel. Keen photographers may have one going spare, but if that's not you you'll need source one.
They aren't that easy to find on their own, so the quickest (and often cheapest) solution is to buy the cheapest item you can find that has one and use it as a donor.
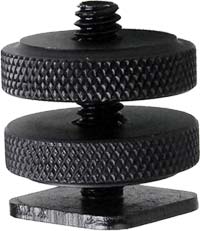
One such product is this Phot-R Cold Shoe Adapter (view it now at Amazon). It has two thumbwheels (approximately 25mm / 1” in diameter). Stick one firmly to your webcam stand (a doubled sided sticky pad works well), and it will be able to accept a mount thread.
Note that when the webcam is in place over the keyboard, the underside of the webcam should be facing you. It is that detail that ensures the keyboard is filmed the right way up, bass to the left, treble to the right. Be careful to attach the thumbwheel to the right side so it can be mounted correctly.
Another possible solution to mounting a webcam that doesn't have a threaded hole is the cheese plate, a plate of metal (often aluminium), with more holes than Swiss cheese.
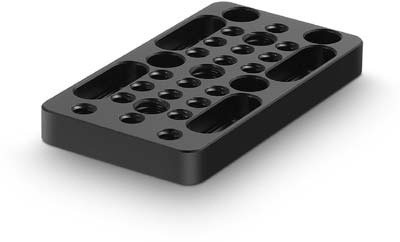
A quick search will find many cheese plates of different sizes and makes. The one shown above is the SmallRig Mounting Cheese Plate 1598. It is 9cm x 5cm (3.5" x 2") and weighs 70g.
You'll be able to see it has multiple round holes, some larger than the others. The larger holes are 3/8", the thread size used by professional equipment (such as large format cameras) as they tend to be heavier and requires thicker bolts. The smaller holes are 1/4", which are the ones we'll be using.
By bolting this to your clamp's ball head (using one of the cheese plate's 1/4" holes), you now have a large plate to which you might be able to tie, lash, clamp, tape or otherwise secure your webcam. The slots in the cheese plate are handy for taking cable ties.
Whether this will work for you depends on your webcam and your ingenuity, but there's a strong possibility the right cheese plate will deliver you a workable solution.
To get an idea of what's available, see all of SmallRig's cheese plates on the SmallRig site.
And Finally
Once you're all set, take a look at our Mounting Accessories page for a few ideas on how to perfect your set-up.
Before you go live, be sure to read our Skype Video Tips.
 Piano Lessons by Video Call